


A robo that turns if something comes in front of it? How cool! Let's build it shall we?
This is going to be an easy robot that is a very fundamental part of the robotics curriculum, and beginners aged 8 and above can easily make it.
So if you’re a beginner and have never made a robot before - not to worry - this is a great choice for your very first robot!
So without further ado - let’s get right into it and see how to make it and how it works.
We will be using Avishkaar’s ABot Advanced kit to make this obstacle avoiding robot.
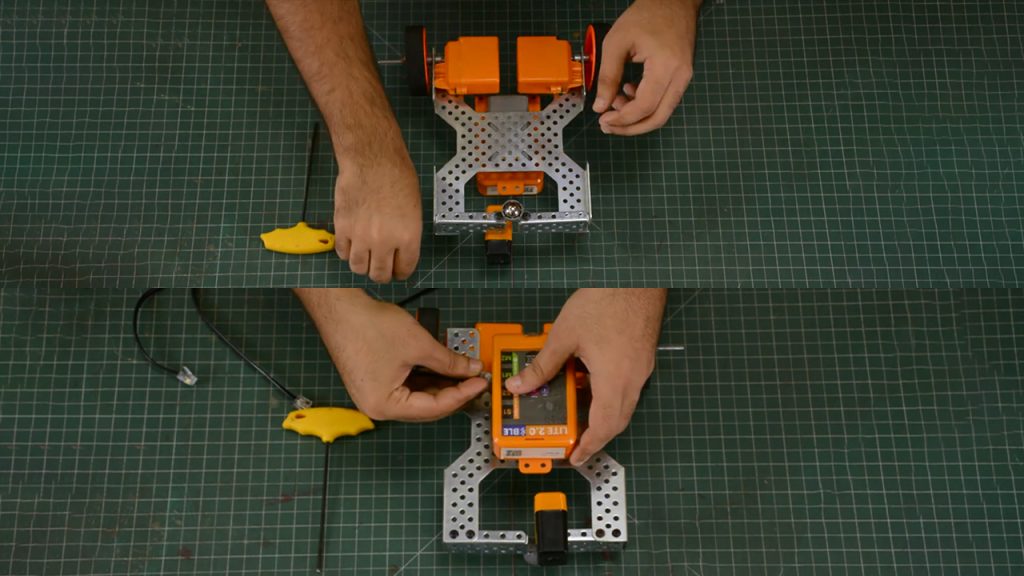
Step 1: Building the Robot
- We need a metal chassis, a few other metal parts, a caster wheel, one IR sensor, two motors, axle shafts, two wheels, some connecting cables, nuts & bolts and a programmable brain.
- The ABot Advanced kit comes with this chassis which makes building the structure really easy.

- We will start by connecting two motors on the rear first.
- Then let’s insert axle shafts in both the motors and lock it with axle locks on both sides so the axle doesn’t come out.
- Now put a filler on both the axles and insert the wheels.
- Finally, let’s lock it with another axle lock which will ensure the wheel doesn’t come out.
- Now let’s connect the caster wheel in the front with the help of these 2.5” U-Beams.

- Now let’s connect the IR sensor in the front.
- And lastly let’s connect the brain on the top and connect the motors and sensors to the brain. We are connecting the left motor to M1 port, the right motor to M2 port and the IR sensor to S1.
So now the structure of our robot is ready and we can get to coding it.
Working of the Robot
You should really understand what infrared waves and the working of an IR sensor. We have already covered that in our previous blog on how to make a line follower robot - so if you haven’t read that already, you should definitely check it out.
Let’s talk about what the algorithm will look like.
- When the IR sensor has no obstacle in front of it, the bot should keep moving forward.
- When the IR sensor detects an obstacle, it should stop, move back a little, take a left turn and then again start moving forward.
Step 2: Coding the Robot
- To code we need to open www.avishkaar.cc and click on the sign in button and create an account.
- Once logged in - you’ll see an AMS button on the top right. Select AMS AI here which is Avishkaar’s latest AMS version with AI capabilities. Select code with Avishkaar hardware option here because we are trying to program the motors and sensors here.

- AMS is a block based coding platform for kids which makes coding really easy, fun and intuitive.
- Begin by adding the ‘my program’ block. This is the main block in your code - without this the code will not work at all.
- Then insert the infinite loop which will ensure the code always keeps running, else fundamentally the program will run once and then stop.
- Inside this put an if/else block. We’ll need to modify this if/else block and stack one else if block under the if block.
- Now begin by programming the robot to move straight if the sensor does not detect an obstacle. Put a comparison block to check the value of the IR sensor. If the sensor returns a value less than 350 - program the bot to move forward.
- Let’s put a comparison block to check the value of the IR sensor. If the sensor returns a value more than 350 - program the bot to move back and take a left turn.

One note - different IR sensors return different values when they detect an obstacle - in case your codes are not detecting the obstacle with this value of 350 - try increasing or decreasing the value of 350 to 300 or 400 or less/more and that should solve the problem.
That’s it - our code is ready. Let’s give it a name, save it, compile it and burn it.
Step 3: Testing the Robot
- Start by burning the code.
- To burn - first you need to turn ON the brain on your robot. And also ensure you turn ON the bluetooth on your laptop.
- Now let’s pair our laptops to the brains over bluetooth and burn the code.


Now go ahead and try it out! Have fun playing with this robot.
Hope we made it easy to follow. In case you don’t have the Avishkaar ABot Advanced Robotics Kit - you can go ahead and check it out.
This is a beginner’s robotics kit which comes with a bunch of metal parts, motors, sensors,nuts & bolts and a programmable brain and can be used to make up to 10 programmable robots. There is a detailed manual inside as well which will help you understand how to build and code different robots.

The interesting thing about this kit is that it is part of a much larger modular robotics design system by Avishkaar which means even though you can only build 10 robots using the kit, you can easily upgrade to some of the more advanced robotics kits by Avishkaar using our bridge kits.
The parts in this kit will still be compatible with the advanced kits and you’ll be able to build hundreds of many more advanced robots.
There is a detailed manual inside which will help you understand how to build and control it. Watch this video below for a detailed tutorial.
Embark on your robotics journey today with Avishkaar's beginner-friendly projects and unlock the endless possibilities of the robotics world!
Join our fabulous community of young, innovative Avishkaaris on WhatsApp here - Let's Avishkaar Express
Discover all Avishkaar kits here.


